A version of this article was published in the November/December 1997
and February/March 1998 issues of Nature Photographer magazine.


Click on the pictures for a larger view and description.


One clear November night, while walking in the woods below my house in New Hampshire, I realized that the moon was so bright that I could turn off my flashlight and continue on unaided. I started to wonder why, if I could see clearly enough to walk through the forest, I couldn't photograph that same forest under similar conditions. The simple fact is that landscapes can be photographed using moonlight, provided you learn a few important techniques and have the right equipment for the job. Just as your eyes adjust to moonlight and allow you to see almost as well as in daylight, a camera can do a very good job exposing film using only the light of the moon.
There is a big difference between daylight images and those taken using the moon's light. The extended period of time required to expose an image at night allows and forces the camera to capture elements of landscapes that the brain is unable to comprehend under normal circumstances. The contours and patterns, the aspects of light and how it interacts with a scene, look vastly different when a subject's rapid change and motion are captured on film -- not as an instant in time, but as 10, 15, or even 40 minutes in time.
Over the last few years, I have worked at developing the techniques and determining what equipment is necessary for achieving success in this very different type of nature photography. This article gives a brief primer on the equipment, techniques, and new ways of thinking necessary to effectively photograph landscapes illuminated only by the light of the moon.


There are several items that are necessary to effectively use the light of the moon to illuminate your landscapes:
TRIPOD
Wood or large metal tripods work best. I have used large Bogen tripods and medium-sized Sliks; both have performed admirably when all screws were tightened to the maximum. People that I have introduced to these techniques who have used small aluminum tripods have not always been satisfied with their performance. I strongly encourage investing in as sturdy a tripod as you can afford if you intend to attempt this sort of photography regularly.
CAMERA
I use my Nikon F3HP, exclusively, for moonlight photography. The more manual your camera, the better. The most difficulty I have ever witnessed a photographer have was experienced by a friend accompanying me in North Carolina as he struggled to make his Nikon N90 accept the length of exposures he was attempting to program into it.
Any camera that can easily be set for manual exposure using a cable lock is appropriate for moonlight photography.
LENSES
I bring a variety of lenses with me, ranging from a 35mm f2.0 to a 300mm f4.5. Use whatever lenses you already own and are comfortable with. Although the faster your lenses are the less time you will actually have to spend photographing, speed is not your most important consideration.
FILM
Contrary to what logic may suggest, in this case, faster is not better! I cannot overemphasize this. To spend hours of your night photographing a beautiful scene only to have the images come back grainy is not acceptable. The time you save with faster films will not be enough to make it worth your while. There are only a few films that I would consider: Kodachrome and the slower Fuji slide emulsions.
When photographic film is exposed for very long lengths of time, it often is affected by what is called reciprocity failure. Reciprocity failure, which causes color shifts in developed images, varies depending upon the film's chemical formulation. When Kodachrome suffers reciprocity failure, images gain an orange-reddish cast. When Fuji's Velvia and Provia suffer reciprocity failure, they gain a bluish-green cast. If my images are to shift their color balance, I prefer that they lean towards the blue-green side of the spectrum, so I use Fuji's Provia for this type of photography. If you have a favorite slow film that you are accustomed to using, use it. I recommend a speed ranging from 50 to 100 ASA, although Kodachrome users may want to experiment with their 25 ASA slide film.
MISCELLANEOUS EQUIPMENT
The above items, plus a high-quality cable lock (I have seen three cable locks fall apart and instantly finish these outings), are all of the photographic equipment needs that you will have. I do not recommend using filters to get around reciprocity issues or for any other reason. The exposures are too long and you are likely to get disturbing or confusing "ghosts" of reflective light sources that you did not see when you framed the image. Each time you go out for a moonlight shoot, as for any important shoot, you should ensure that you have plenty of fresh batteries on hand to keep your camera's shutter functioning. This is particularly important if you use an automated camera which has a high electricity and battery demand.
NON-PHOTOGRAPHIC EQUIPMENT
There are a number of non-photographic needs that should be addressed. The first of these is a source of light beyond that of the moon, for your own use and safety. You must safely get to the spot where you plan to take your photos. In addition, you must be able to choose apertures, change lenses, and so forth, in between shots. If you choose to photograph smaller details of your scene, you will need to illuminate these in order to focus. Having tried many different types of light sources, I wholeheartedly recommend the use of a headlamp. You will need a watch or a stopwatch of some sort to time your exposures.

Keep in mind that you will be taking these photographs late at night, presumably following a full day and knowing that you have to drive home following your successful trip. It is essential, therefore, to prepare for your physical needs: bring along snacks and water (and possibly a thermos of your favorite beverage) to keep your body happy and well-fueled. Out in nature late at night is no time for mistakes caused by hunger and fatigue. Also, dress with the understanding that you will be still for several hours, late at night. Wear an extra layer or two of clothing beyond what you think necessary, and thicker socks than you think you need.


When taking photographs utilizing the moon as your primary light source, time is of the essence. There are only a few days each month when moonlight photography is even possible. Although the night of the full moon is the best, there is usually sufficient light to photograph with on either of the two days before or after.
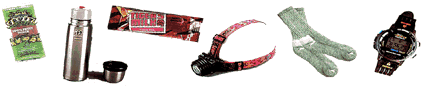
The light is best for your purposes starting about two to three hours after the moon rises. At this time, it will be high enough in the sky to fully light your scene, without losing shadows, which will happen when it is directly overhead. This ideal time to shoot may occur at any time of the night, depending upon what time the moon rises. You will find that some months it is not possible to shoot at all because the moon rises extremely late or during the daylight hours. Check the weather section of your newspaper to determine moonrise times.
Even after you have learned from experience the time necessary for moonlight compositions in your favorite spots, a nighttime photo session will take 2-3 hours to capture 10 or more images. Plan accordingly. I have only managed a few times, in the summer months when it was warm, to shoot an entire roll of film in a single outing. When you are beginning the learning process, expect to take only two to five different images per shoot, accounting for time spent bracketing. If you can convince a photographer friend to come along, it is not only easier to pass the time, but safer. I recommend that all but the most experienced outdoorspeople make this an excursion for at least two people.


Composition is vitally important to moonlight photography, as it is to all photography. I will not dwell upon the usual "rules" of composition, many of which by necessity apply to this process. There are additional rules that apply specifically to landscapes taken by the light of the moon.
The first is to avoid placing too much sky in your pictures. The sky has almost no albedo, or reflectivity. In addition, there are numerous light sources found in the sky -- planets, stars, airplanes, the moon, UFOs, and the like -- which will not only effect your exposure, but may also create unpleasant bright streaks through your image. If you are shooting near an urban area, the sky will likely be very bright due to light pollution. Flight patterns may bring airplane lights through your image. I try to keep the sky to a minimum in nighttime photographs, unless I know that there will be little light interference.


It is useful to try to include in your images subjects with a variety of albedo. I like to shoot rocks, trees and other plants, and especially water. Rivers and streams with waterfalls or rapids are ideal for moonlight photography because the water reflects different amounts of light depending upon how it moves. A scene which includes still water, a waterfall or rapids, and a shore of some type works well. I have also had wonderful results with the beach, especially with large breaking waves, due to the various characters of light reflected in different parts of the scene. Shadows cast by objects are valuable in illustrating the difference between moonlight and daylight in your images.
Bracket your exposures. The likelihood of properly exposing your first attempt at moonlight photography is almost zero. All of the rules that you have been taught, your light meter and probably the light meter in your camera, are useless to you now. You may want to test the ability of your camera to correctly expose your images. Although no manufacturer will claim to have programmed its camera to deal with exposures much longer than 15 seconds, the camera doesn't always know that! I have found that my F3 occasionally comes close to correctly exposing images of an almost unbelievable length of time; yours may too. Despite this, do not count on your camera to properly expose your nighttime images.
Always set your lens to its fastest aperture, focusing on infinity (unless you are shooting a detail and have used your light to focus upon it). With your camera on a sturdy tripod, an appropriate composition framed within your viewfinder, your lens wide open and focused out, and a cable lock attached to your shutter mechanism, you are ready to start taking pictures.


Make your first exposure approximately 2 minutes, your second around 5, your third around 10, and take a fourth for about 15 minutes. Clearly, time constraints will prevent you from taking more than a few different pictures until you learn the character of the light where you are shooting. The amount of water or rocks in your frame will greatly effect the length of your exposures; the more high-albedo objects or surfaces, the less time you will need (snow is the best!).
Unlike daytime photography, a few seconds of exposure either way is negligible. If you miss the time you specified to stop your exposure, it is not a catastrophe. When dealing with 10-20 minute exposures, it takes entire minutes to alter the exposure noticeably. Experiment with the length of exposure your first few times out. Write down the length of each exposure consistently; this will help you identify "typical" exposure times for various light and scenery qualities.


During the day, your eyes rely primarily upon the cones in the retina, seeing the world in color. As the sky darkens at night, the rods in your retina take over most of the work of vision, and you begin to see the world in white, gray, and black. What you see in the landscape is not what your camera and film will capture.
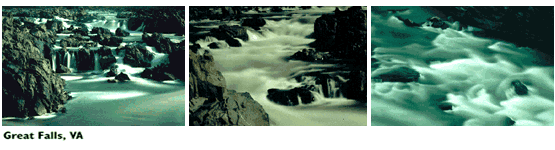
Color slide film always sees in color, regardless of what the photographer perceives with her brain.
The leaves of trees that you perceive as gray will be green to your camera, if exposed long enough. As in the daytime, still water reflects the color of the sky over it. Moving or falling water becomes a bright white reflection of the moon's light. Rocks are still gray, while wood is brown. Flowers, if their blossoms are open, are the same color they would be in daylight, even though you perceive them to be gray. Shadows of moonlight are often more blue-tinted than those of daylight. The light falling upon everything is much whiter, less yellow, than the light of the sun. All of these hues are invisible to you as you look at the scene through your viewfinder. Your brain sees shades of gray where there is in fact a myriad of colors waiting to be released onto your film with extremely long exposures. None of the colors can be perceived by your brain at night, but your camera will capture them for you if you let it.
Be aware that clouds in the sky will greatly affect this particular photographic pursuit. Do not be afraid of skies with partial clouds, but do determine beforehand where the clouds will be in the sky in relation to the moon. If they will obscure its light substantially, consider another night. Clouds create color and tonal differences in moonlight photographs, and if they do not obscure the moon, they can create very interesting effects. Increase the time of each exposure by several minutes on nights when the moon shines through thin clouds.


Photographing landscapes by the light of the moon is not something that should be attempted by people who need to see quick results. Hours will be spent taking only a few images, with uncertain results.
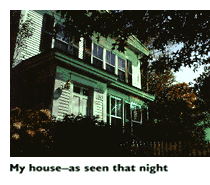
In your first outings, while you learn about super-long exposures and the compositional elements within them, you are likely to have few great images. But you will see in those images a world that is entirely different from the one you perceive when you look at it -- in daylight or at night. As a photographer who strives to see and capture the beauty present in the natural world, I think that one of the greatest rewards is to see, to discover, a new beauty that had been hidden.
It has taken me years to develop confidence in my ability to walk into a landscape in the dark and photograph it effectively. With the appropriate tools, technical knowledge, techniques, and patience, I learned -- and so can you. All photography is trial and error, and relies upon a faith that what you "see" is what will turn up on your processed film. There is a great difference that I must reemphasize here: What you see is not what you will get when you photograph using the light of the moon. You get something that you will begin to see only after you have "gotten" it. The greatest worth of this technique may be that in addition to capturing beautiful images on film (perhaps reward enough), you are likely to learn a new way of perceiving nature and the processes active within it.

return to home page

Copyright 1997 Bruce B. Clendenning